Introduction
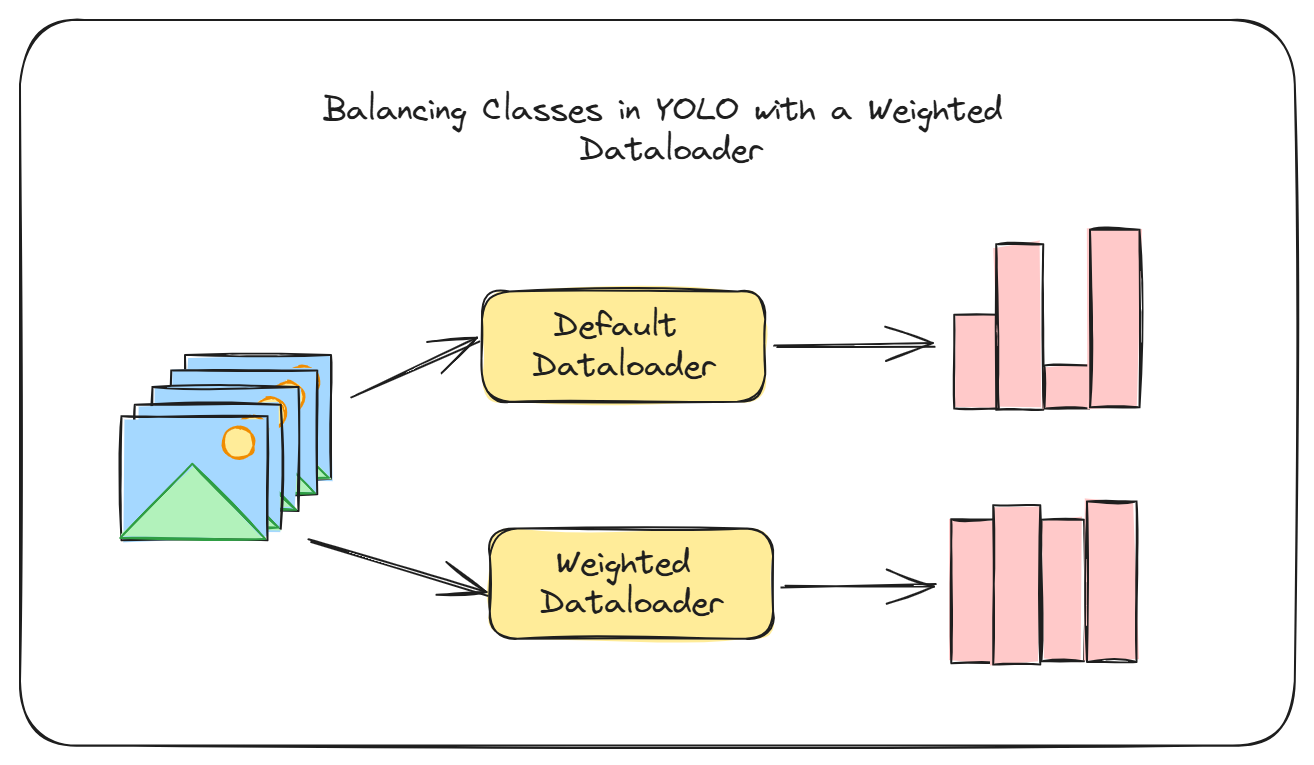
Oftentimes, the dataset you have is not balanced. You might have some classes that are underrepresented and some that are overrepresented. It sometimes helps to account for these imbalances during the training process. One of the ways to accomplish this is to use a weighted dataloader. Compared to other approaches, the weighted dataloader has some key benefits:
- Simplicity: Unlike adding loss weights, which can get tricky and are tied to the specific loss function, a weighted dataloader is straightforward and easier to implement, as you’ll see.
- Preserve All Data: You don’t have to undersample the majority class to balance things out. You get to use all your data, which is a big plus.
- Smoother Weight Updates: With loss weights, the model might not frequently see batches containing minority classes, leading to sudden loss spikes when it does. A weighted dataloader avoids these sharp gradient shifts by ensuring a more consistent representation of all classes throughout training.
In this guide, we’ll walk through implementing a weighted dataloader for YOLO in Ultralytics, but the approach should work with other Ultralytics models that use the same data loading class. You can find the full Colab notebook by clicking the “Open in Colab” badge above.
Implementation
To implement the dataloader, we start by creating a new Dataset class that
inherits from the existing YOLODataset class. In this new class, we add the
necessary methods to handle weight balancing and override the __getitem__
method to return images based on the calculated probabilities for each one.
This ensures that the dataloader provides a more balanced distribution
of images during training.
class YOLOWeightedDataset(YOLODataset):
    def __init__(self, *args, mode="train", **kwargs):
        """
        Initialize the WeightedDataset.

        Args:
            class_weights (list or numpy array): A list or array of weights corresponding to each class.
        """

        super(YOLOWeightedDataset, self).__init__(*args, **kwargs)

        self.train_mode = "train" in self.prefix

        # You can also specify weights manually instead
        self.count_instances()
        class_weights = np.sum(self.counts) / self.counts

        # Aggregation function
        self.agg_func = np.mean

        self.class_weights = np.array(class_weights)
        self.weights = self.calculate_weights()
        self.probabilities = self.calculate_probabilities()

    def count_instances(self):
        """
        Count the number of instances per class

        Returns:
            dict: A dict containing the counts for each class.
        """
        self.counts = [0 for i in range(len(self.data["names"]))]
        for label in self.labels:
            cls = label['cls'].reshape(-1).astype(int)
            for id in cls:
                self.counts[id] += 1

        self.counts = np.array(self.counts)
        self.counts = np.where(self.counts == 0, 1, self.counts)

    def calculate_weights(self):
        """
        Calculate the aggregated weight for each label based on class weights.

        Returns:
            list: A list of aggregated weights corresponding to each label.
        """
        weights = []
        for label in self.labels:
            cls = label['cls'].reshape(-1).astype(int)

            # Give a default weight to background class
            if cls.size == 0:
              weights.append(1)
              continue

            # Take mean of weights
            # You can change this weight aggregation function to aggregate weights differently
            weight = self.agg_func(self.class_weights[cls])
            weights.append(weight)
        return weights

    def calculate_probabilities(self):
        """
        Calculate and store the sampling probabilities based on the weights.

        Returns:
            list: A list of sampling probabilities corresponding to each label.
        """
        total_weight = sum(self.weights)
        probabilities = [w / total_weight for w in self.weights]
        return probabilities

    def __getitem__(self, index):
        """
        Return transformed label information based on the sampled index.
        """
        # Don't use for validation
        if not self.train_mode:
            return self.transforms(self.get_image_and_label(index))
        else:
            index = np.random.choice(len(self.labels), p=self.probabilities)
            return self.transforms(self.get_image_and_label(index))
The Detect, Segment and Pose models are usually trained using labels that
have multiple objects. So we have to somehow aggregate the weights of all the
labels in an image to get the final weight for that image. In the above
implementation, we use np.mean, but you can try other aggregation functions
such as np.max, np.median, np.sum or even something custom and more
nuanced.
We can then just monkey-patch the YOLODataset class in build.py like so:
import ultralytics.data.build as build

build.YOLODataset = YOLOWeightedDataset
While there are more Pythonic ways to make the training use the custom class, I
found this method to be the simplest and most versatile. It works across all
YOLO models in Ultralytics, including Detect, Segment, and Pose, and even
extends to RTDETR.
Testing the weighted dataloader
I ran a short test on a traffic lights dataset that I found on Roboflow, which has the following class distribution:
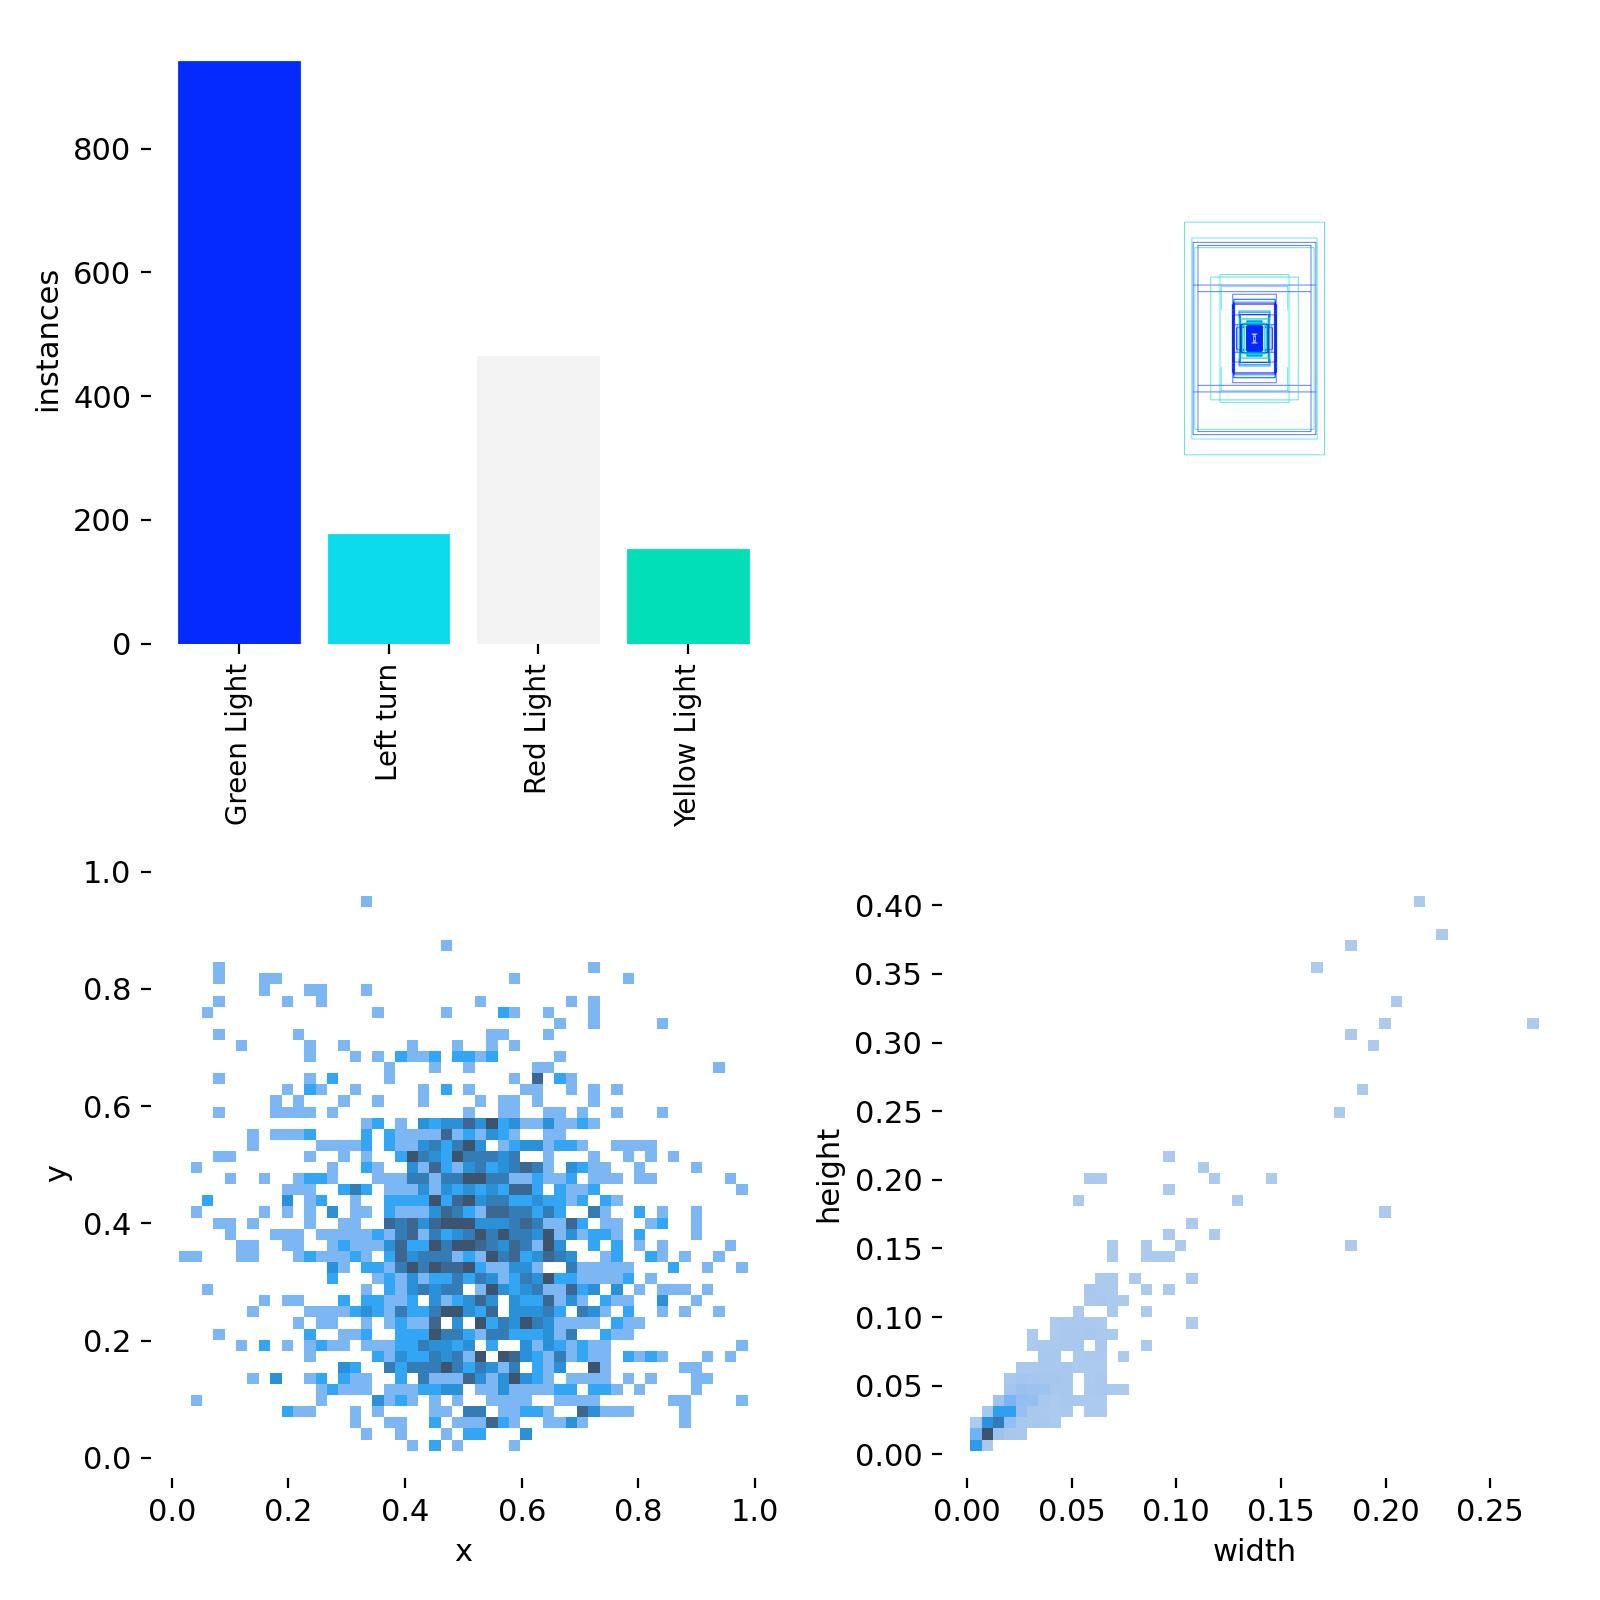
Class distribution of the traffic lights dataset
As you can see, the Yellow Light and Left Turn classes are
underrepresented, making this an ideal scenario to test the weighted dataloader
we created.
In the first training run, we didn’t use the weighted dataloader. We trained
for 50 epochs using yolov8n.pt as the starting checkpoint, resulting in the
following metrics:
                 Class     Images  Instances      Box(P          R      mAP50  mAP50-95): 100%|██████████| 7/7 [00:06<00:00,  1.01it/s]
                   all        199        495      0.764      0.604      0.647      0.357
           Green Light        123        260      0.822      0.693      0.755      0.397
             Left turn         36         65       0.91      0.619      0.688      0.387
             Red Light         61        135      0.728      0.595      0.589      0.301
          Yellow Light         15         35      0.598       0.51      0.556      0.343
For the next training run, we switched to the weighted dataloader and similarly trained it for 50 epochs. The results were the following:
                 Class     Images  Instances      Box(P          R      mAP50  mAP50-95): 100%|██████████| 7/7 [00:06<00:00,  1.07it/s]
                   all        199        495      0.831      0.601      0.673      0.351
           Green Light        123        260      0.895      0.658      0.754      0.383
             Left turn         36         65      0.906      0.596      0.692      0.351
             Red Light         61        135      0.811      0.578      0.623       0.32
          Yellow Light         15         35      0.712      0.571      0.622      0.351
The overall mAP50 increased by 2.5, with the most significant improvement in
the Yellow Light class, one of the underrepresented classes, where the mAP50
jumped by 6.6.
Additionally, you’ll notice that more images from the minority classes appear in the training batch plots when using the weighted dataloader, compared to the default dataloader:
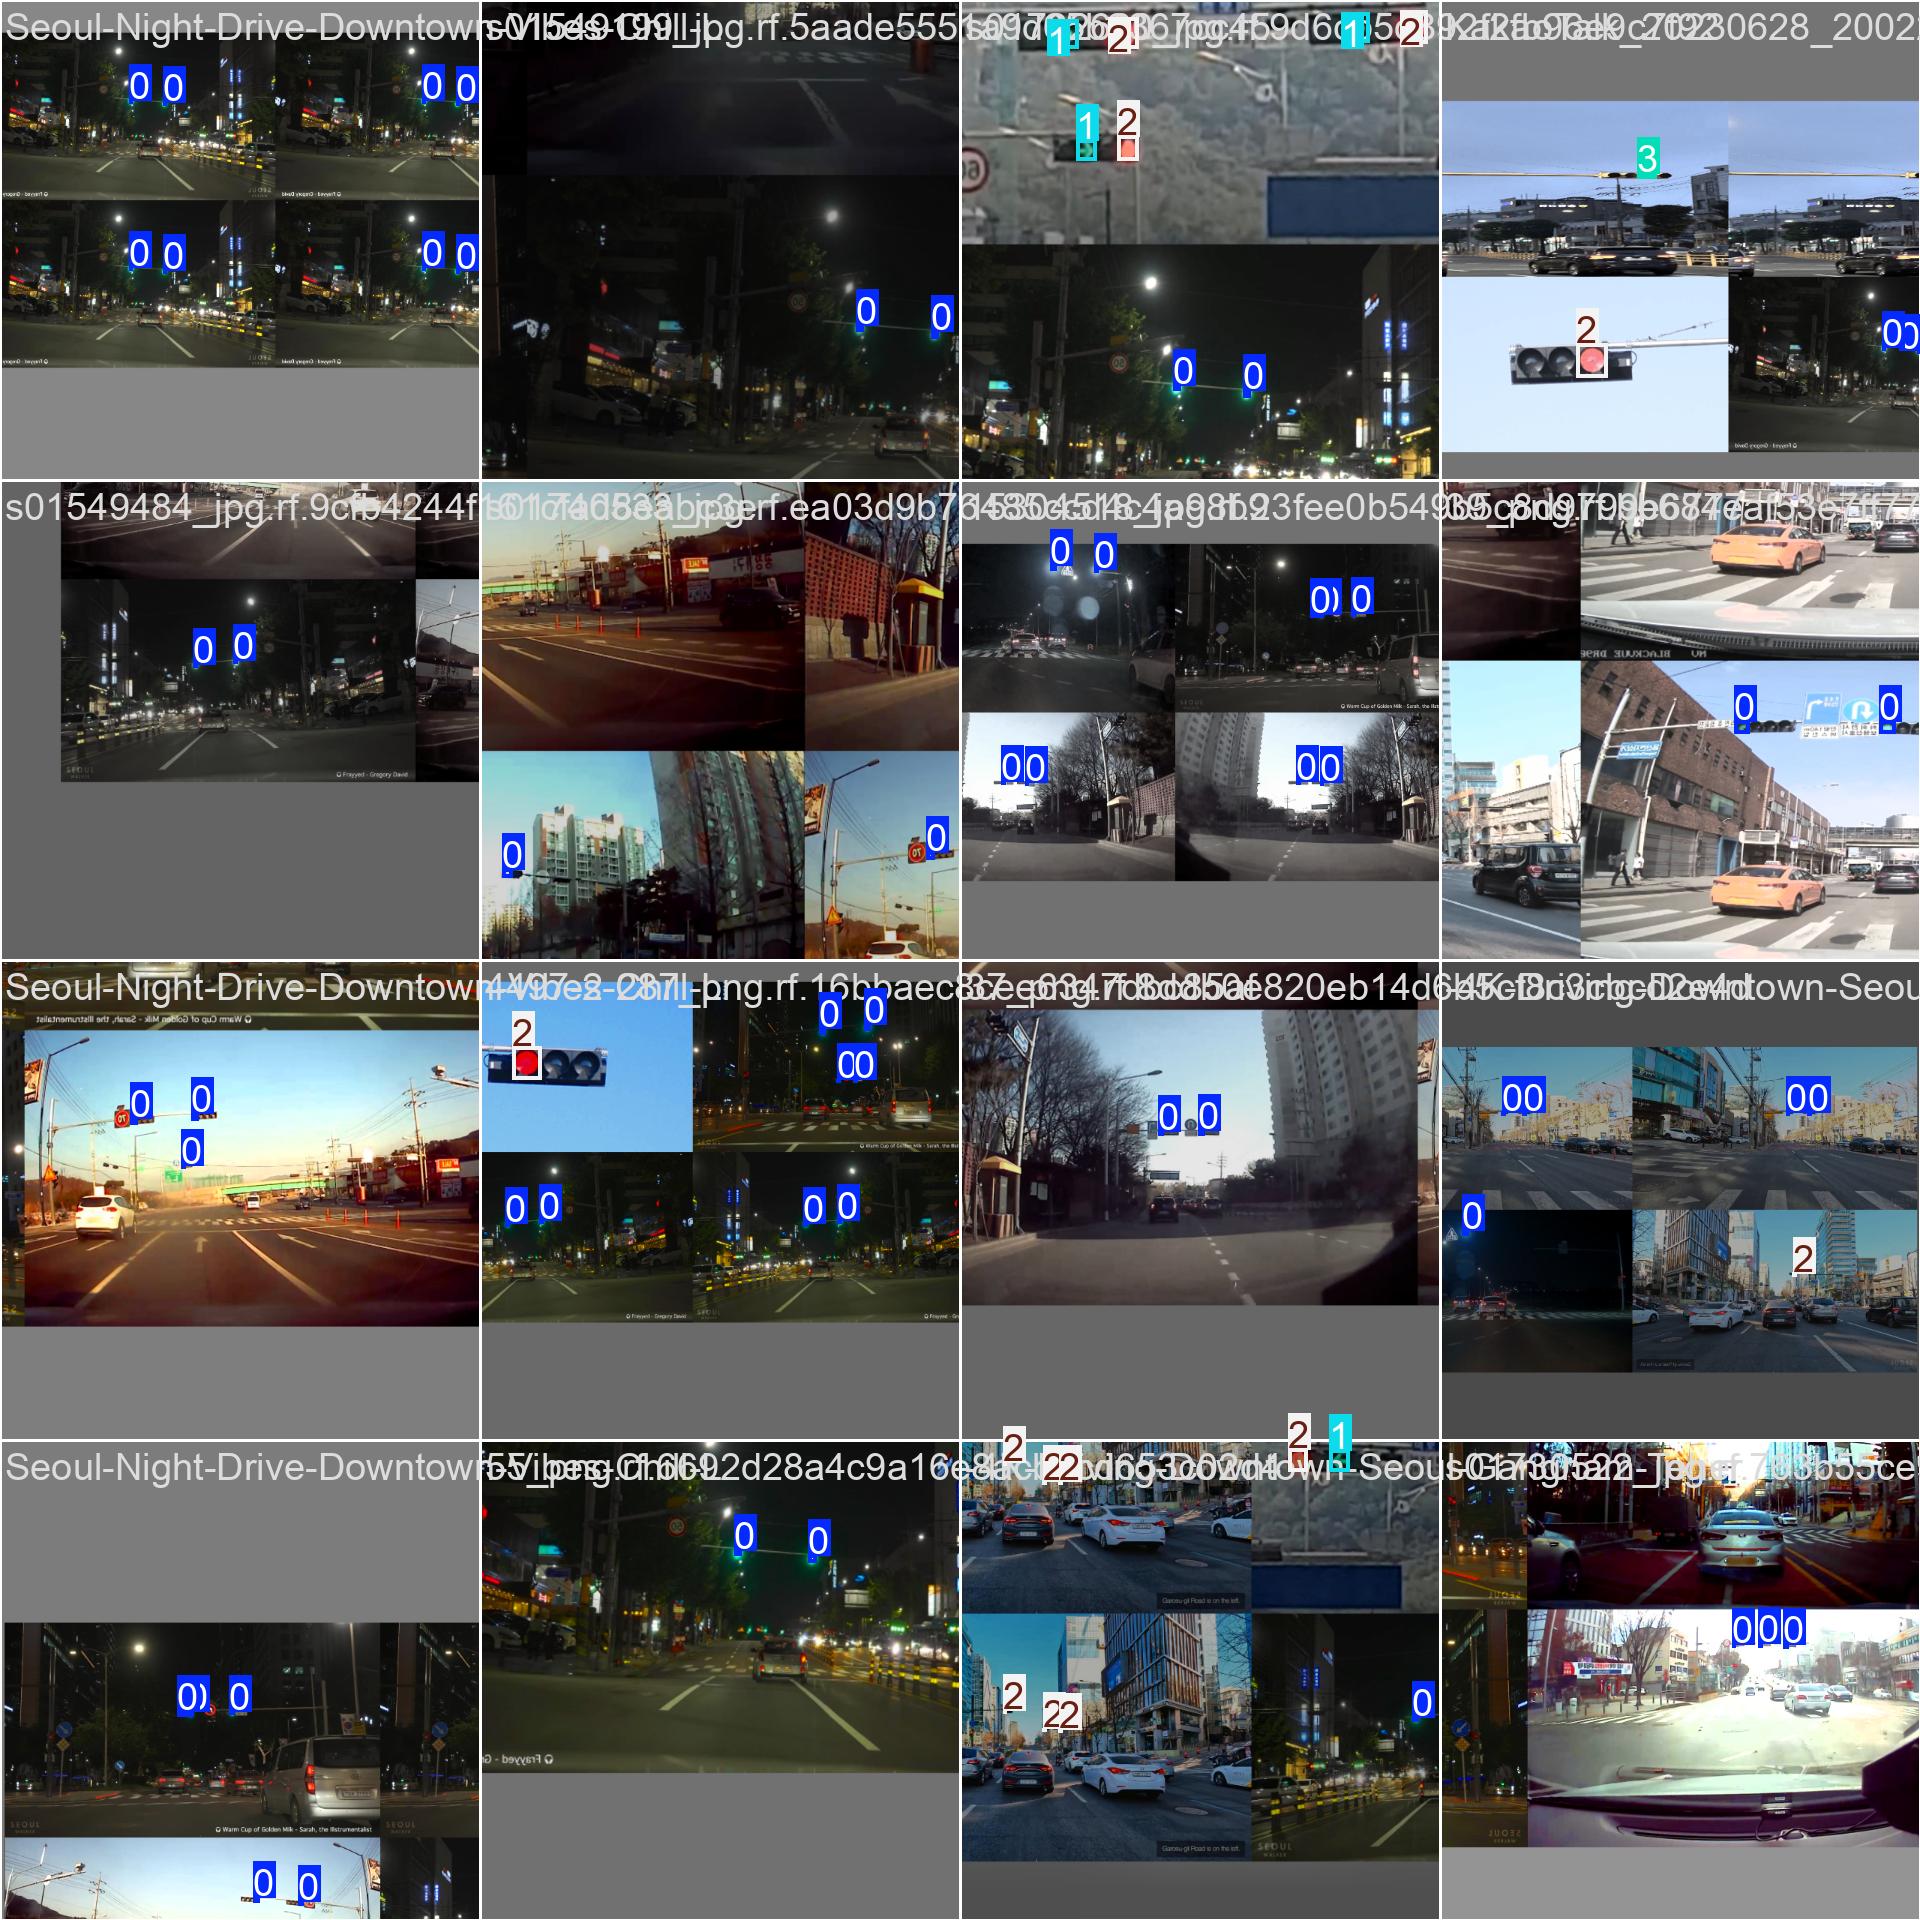
Default Dataloader
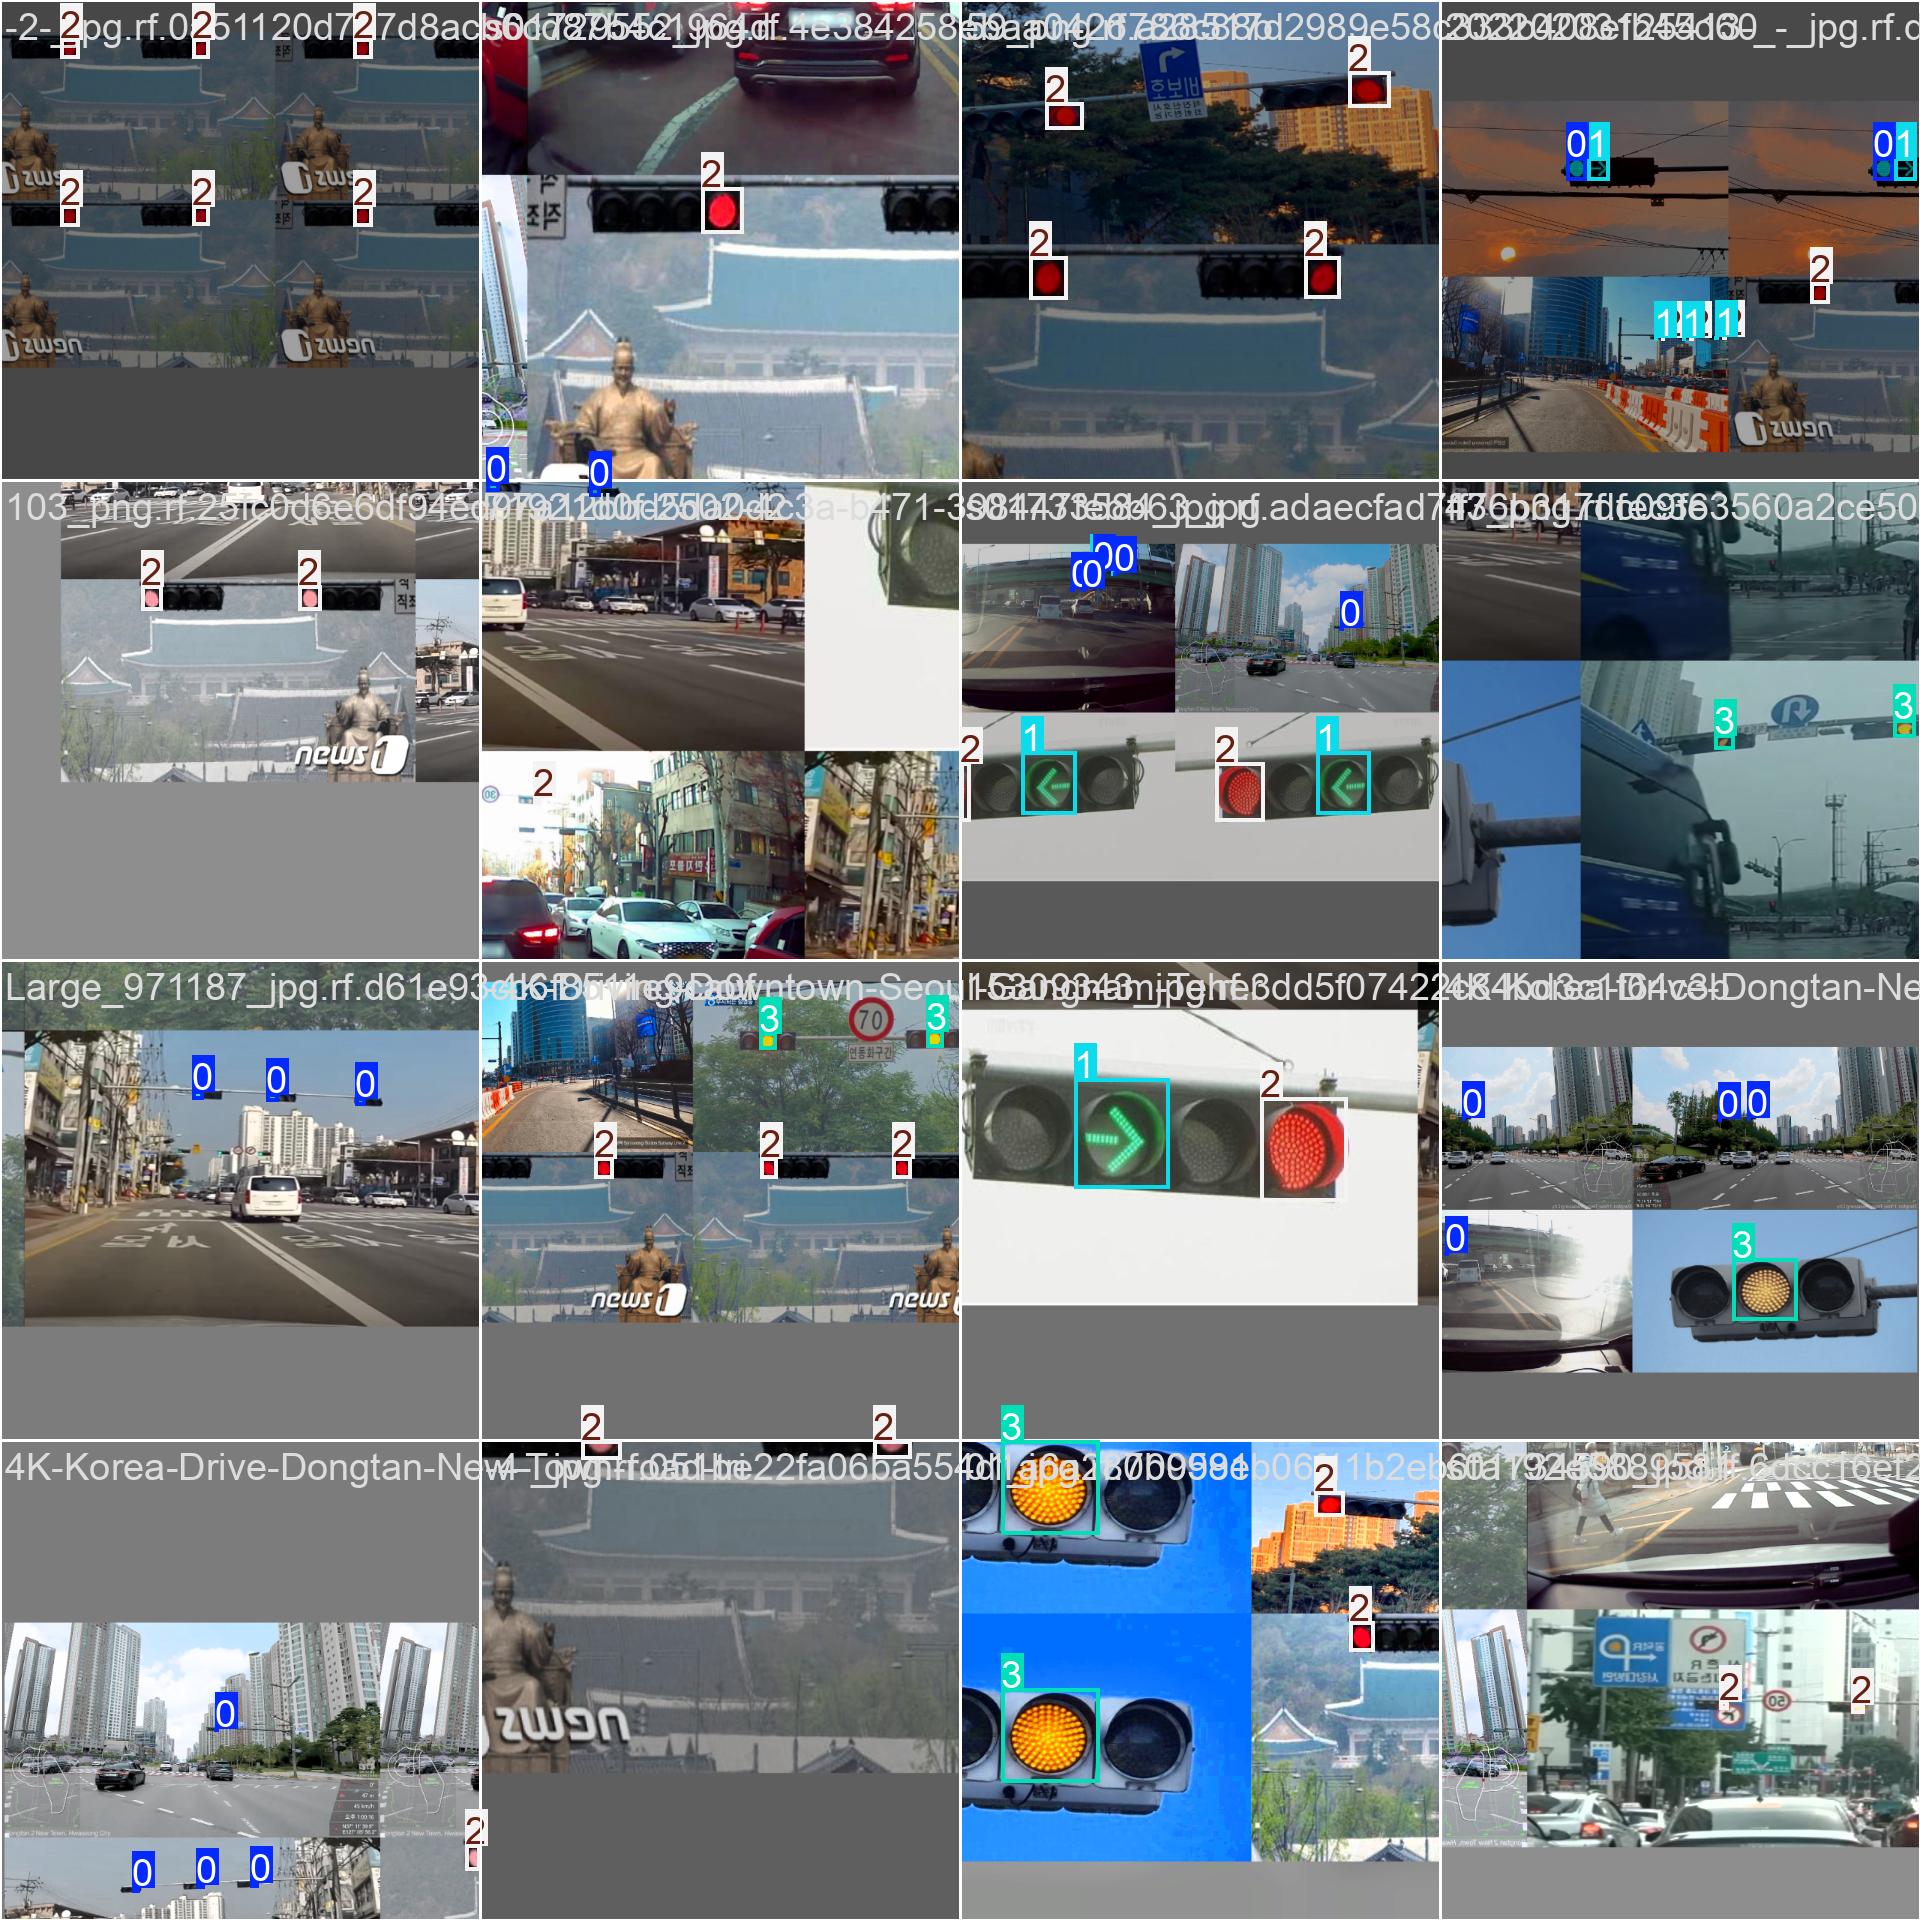
Weighted Dataloader
Is it perfectly balanced?
Since an image can have multiple labels, you can’t always individually increase the instances of one particular class to make them perfectly balanced, because if an image has both a majority class and a miniority class, using that image in the batch will increase the instances of both the majority and minority class in the batch.
From the testing, I noticed that using np.sum aggregation resulted in a
somewhat more balanced class distribution than np.mean:
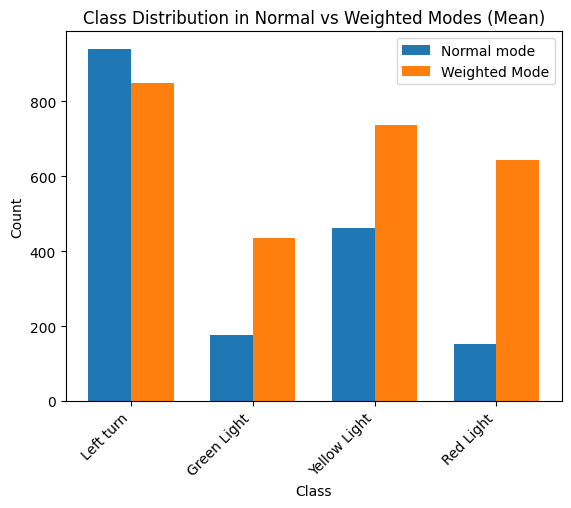
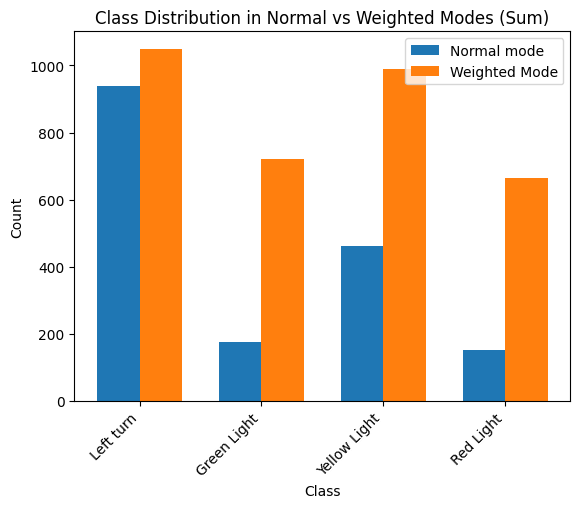
But this can vary from one dataset to another, so it would be good test different aggregation functions to see what works best for your dataset.
Conclusion
In this guide, we demonstrated how easy it is to create and implement a
weighted dataloader and seamlessly integrate it with the ultralytics library.
We avoided any complicated changes to loss functions and didn’t even need to
modify the source code directly. However, it’s worth noting that using loss
function weights has an advantage in scenarios where images contain multiple
classes, as it can be challenging to perfectly balance those with a weighted
dataloader. Experimenting with different aggregation functions might help you
achieve the best results for your dataset.
Thanks for reading.