Introduction
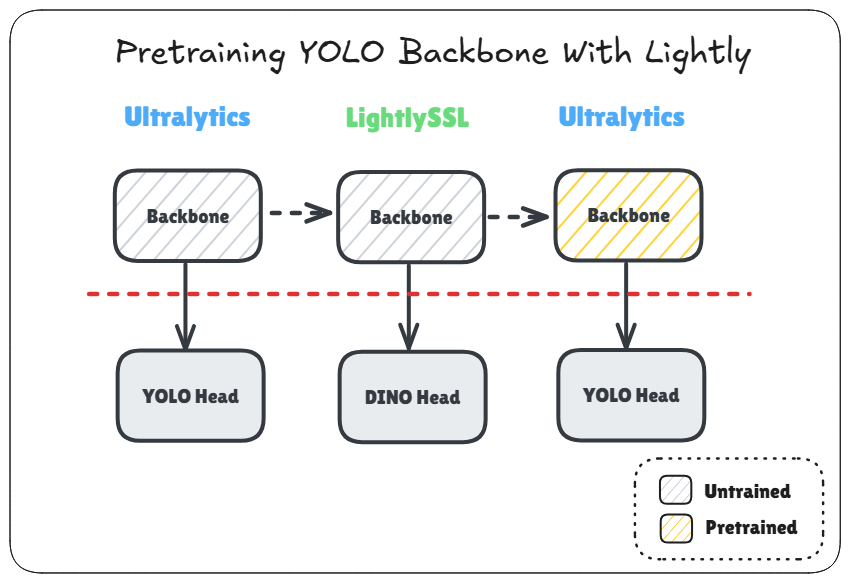
LightlySSL is an elegant and easy-to-use framework for self-supervised learning. It allows you effortlessly pretrain a backbone of your choice through several popular self-supervised learning techniques. In this guide, we will look at how to use Lightly to pretrain a YOLO backbone using DINO and also how to load it back into Ultralytics for fine-tuning. The Colab notebook with the complete code can be accessed by clicking the “Open in Colab” badge above.
Implementation
We will modify this example notebook demonstrating how to use DINO through Lightly. There are only a few modifications we need to make. The first and the most obvious one is to change the backbone to the one used by YOLO, which we do as follows:
yolo = YOLO("yolo11n.pt")

class PoolHead(nn.Module):
  """ Apply average pooling to the outputs. Adapted from Classify head."""
  def __init__(self, f, i, c1):
    super().__init__()
    self.f = f  # receive the outputs from these layers
    self.i = i  # layer number
    self.conv = Conv(c1, 1280, 1, 1, None, 1)
    self.avgpool = nn.AdaptiveAvgPool2d(1)

  def forward(self, x):
    return self.avgpool(self.conv(x))

# Only backbone
yolo.model.model = yolo.model.model[:12]  # Keep first 12 layers
dummy = torch.rand(2, 3, GLOBAL_CROP_SIZE, GLOBAL_CROP_SIZE)
out = yolo.model.model[:-1](dummy) # Run forward pass only using the first 11 layers
yolo.model.model[-1] = PoolHead(yolo.model.model[-1].f, yolo.model.model[-1].i, out.shape[1])  # Replace 12th layer with PoolHead
In this snippet, we are first loading the YOLO model and then stripping away the head. For YOLO11, the backbone is the first 11 layers. You can check the yaml model definition to verify that. Then we attach a PoolHead to the backbone. This PoolHead would take the output of the previous layer and apply a convolution and then adaptive average pooling to reduce the spatial dimensions of the feature map to a fixed and consistent size (1x1). It’s similar to the YOLO Classify head, just without the linear layer. This is required because the spatial dimensions would otherwise vary depending on the size of the input which would make it difficult to attach the DINO head to the backbone since it requires a fixed input size.
After that, we perform another dummy forward pass to get the output channel size of the backbone:
out = yolo.model(dummy)
input_dim = out.flatten(start_dim=1).shape[1]
The input_dim in this case is 1280 and we use that along with the YOLO backbone to initialize the DINO model:
input_dim = out.flatten(start_dim=1).shape[1]
backbone = yolo.model.requires_grad_()
backbone.train()
model = DINO(backbone, input_dim)
Here, we also do two other things prior to creating the model. We enable gradient calculation for the backbone which is disabled by default in Ultralytics. And we also put the backbone in training mode so that BatchNorm statistics get updated during training.
And lastly, we create a transform with a default mean and std that is consistent with what’s used by YOLO:
normalize = dict(mean=(0.0, 0.0, 0.0), std=(1.0, 1.0, 1.0))  # YOLO uses these values
transform = DINOTransform(global_crop_size=GLOBAL_CROP_SIZE, local_crop_size=LOCAL_CROP_SIZE, normalize=normalize)
The GLOBAL_CROP_SIZE is 224 by default. You could use a different size such as 640 which is more consistent with the default image size in YOLO, but it would also consume more VRAM during training. There’s also LOCAL_CROP_SIZE that you can control, which is by default set to 96. These are all DINO related parameters and you can read about them in the Lightly Docs.
And that’s pretty much all the modifications you need to make. You then simply load your dataset, create your dataloader, define the loss function and optimizer, and start training. I am just using the defaults in the DINO notebook.
Loading The Pretrained Backbone in Ultralytics
To load the pretrained backbone back into Ultralytics after pretraining, you just need these few lines:
from ultralytics import YOLO

# Load the same model that was used for pretraining
yolo = YOLO("yolo11n.pt")

# Transfer weights from pretrained model
yolo.model.load(model.student_backbone)

# Save the model for later use
yolo.save("pretrained.pt")
This snippet transfers the weights from the matching layers in the pretrained backbone back to the loaded YOLO model. And then you can just save it as a typical Ultralytics model and load it normally for fine-tuning:
from ultralytics import YOLO

yolo = YOLO("pretrained.pt")

results = yolo.train(data="VOC.yaml", epochs=1, freeze=0, warmup_epochs=0, imgsz=640, val=False)
Results From Fine-Tuning
Pretraining is usually performed on a very large dataset and for several epochs. Nevertheless, I tried performing a sanity check by fine-tuning the pretrained backbone on the same PASCAL VOC dataset in Ultralytics that was also used for pretraining. The performance was not better than starting from the COCO pretrained model in this case, but then again, like I said, this was just a sanity check and not actual pretraining which takes much longer.
One epoch of fine-tuning with SSL pretrained backbone:
Epoch    GPU_mem   box_loss   cls_loss   dfl_loss  Instances       Size
1/1      3.25G      1.562      3.229      1.729         54        640: 100%|██████████| 1035/1035 [06:15<00:00,  2.76it/s]
            Class     Images  Instances      Box(P          R      mAP50  mAP50-95): 100%|██████████| 155/155 [00:52<00:00,  2.97it/s]
            all       4952      12032      0.265      0.234      0.162     0.0887
One epoch of fine-tuning with COCO pretrained backbone:
Epoch    GPU_mem   box_loss   cls_loss   dfl_loss  Instances       Size
1/1      2.94G      1.169      2.335      1.419         54        640: 100%|██████████| 1035/1035 [06:57<00:00,  2.48it/s]
            Class     Images  Instances      Box(P          R      mAP50  mAP50-95): 100%|██████████| 155/155 [00:51<00:00,  3.03it/s]
            all       4952      12032      0.585      0.537      0.556      0.356
Conclusion
This was a short guide on how to use Lightly to pretrain a YOLO backbone and then load it back into Ultralytics for fine-tuning. Unfortunately, I didn’t have the resources to run longer and more thorough experiments to check the difference it makes. You can also check out this thread in Lightly Discord that discusses pretraining a YOLO backbone and the caveats.
If you do get better results with pretraining as opposed to starting from COCO pretrained models, you can share the results in the comments. Thanks for reading.