Introduction
Newcomers to deep learning often seem to ask this one question: how do they go about adding extra classes to an already trained model? The answer to this question is not usually what they want. When they say they want to add classes, they mean incrementally adding those classes without affecting the performance of the already trained classes. They usually ask this in the context of pre-trained models, such as models pre-trained on the MS COCO dataset.
The difficulty arises from the fact that weights in a deep learning model are not specific to any class such that you can freeze some specific weights and thereby freeze the performance of the model on specific classes, and then train others or add newer ones. Without modifying the architecture, you’ll always end up disturbing existing weights and consequently the model’s performance on the trained classes.
So there are a couple of options available to someone who wants to add new classes to a model pre-trained on MS COCO:
- Download the MS COCO training set containing 118k images and then add your new classes to the dataset. This way the model weights are still optimized to perform well on the existing classes. However, the problem with this approach is unless you have lots of data for the classes that you wish to add, 1000+ images at least, your added class is pretty likely to drown due to being the minority in the dataset. Not to mention the tediously long training times.
- Download a smaller version of the dataset such as COCO-minitrain and then do the same as in 1, add your classes and retrain. This is less cumbersome than training on the whole MS-COCO dataset, however, there’s no guarantee that your model will continue to perform as well as the original on the COCO classes. After all, the performance of deep learning models depends a lot on the amount of data used to train them.
- Add an extra head just for the new classes and train the new head. This is a lesser-known and more surgical option, but it has the benefit that you can keep the existing weights undisturbed and the performance on the existing classes remains the same, while also avoiding the large data requirement and long training times of Option 1, and the potential performance degradation of Option 2.
In this guide, we will attempt Option 3 on the YOLOv8n COCO pretrained model. Although this guide is for YOLOv8n, the idea remains the same for all deep learning models with task-specific heads, including image classification and segmentation models. The notebook with all the code can be accessed by clicking “Open in Colab” badge above.
Training a custom model
Let’s start with the easy part first: training a custom YOLOv8 model with our new classes. For this tutorial, we will be adding the license plate class to the model. We will use one of the datasets from Roboflow. This dataset has two classes for license plates. I am not sure what the difference between them is, but that’s not crucial here:
from roboflow import Roboflow
rf = Roboflow(api_key=API_KEY)
project = rf.workspace("project-n3wam").project("project-ttd5y")
version = project.version(1)
dataset = version.download("yolov8")
In Colab, we have to move the data to the correct folder:
mkdir -p /content/datasets/Project-1
mv Project-1/** /content/datasets/Project-1
mv /content/datasets/Project-1/data.yaml /content/datasets
Before we start the training, we also have to make some changes to the library. For this, first clone the ultralytics library and then checkout the exact revision used for this tutorial to avoid any problems:
git clone https://github.com/ultralytics/ultralytics
cd ultralytics

# The patch may break for later versions. Change to the one used when writing this.
git reset --hard 6806f15396432fffb951250d650454b840eb4c28

# Install this ultralytics repo as an editable Python package
pip install -e .
To save you time, I have also turned the changes we will be making in this tutorial into a patch which you can easily apply through git:
wget https://gist.githubusercontent.com/Y-T-G/8f4fc0b78a0a559a06fe84ae4f359e6e/raw/f8e9ba1644cbfa86295f14fbe26c3d91a504b155/add_head.patch
git apply add_head.patch
The patch includes multiple changes, but most of them are for the next section of the guide. For the training, this patch doesn’t change much except change the order of callbacks:
diff --git a/ultralytics/engine/trainer.py b/ultralytics/engine/trainer.py
index 3382117..da6b9c1 100644
--- a/ultralytics/engine/trainer.py
+++ b/ultralytics/engine/trainer.py
@@ -340,8 +340,8 @@ class BaseTrainer:
         epoch = self.start_epoch
         while True:
             self.epoch = epoch
-            self.run_callbacks("on_train_epoch_start")
             self.model.train()
+            self.run_callbacks("on_train_epoch_start")
             if RANK != -1:
                 self.train_loader.sampler.set_epoch(epoch)
             pbar = enumerate(self.train_loader)
Yes, we will be writing a callback. We want to use the head of this custom-trained model alongside the old head from the COCO pre-trained model. To use both of the heads, we need to ensure they operate on the same input, i.e. the layers before the head should produce the same output. YOLOv8 supports freezing the layers during training, and in this case, we will be freezing the first 22 layers because those are the number of layers before the head. You can find this by printing the keys and checking the number of the last layer:
from ultralytics import YOLO
import torch
import copy


# Initialize pretrained model
model = YOLO("yolov8n.pt")

# Keep a copy of old state dict for sanity check
old_dict = copy.deepcopy(model.state_dict())

# We should freeze all but the last layer
model.state_dict().keys()
Although freezing the layers prevents the layer weights from being updated, there’s however another thing that gets updated during training: the batch normalization stats. Freezing the layers does not prevent these metrics from getting updated. This is why we need a callback. We will put all the batch norm layers in eval mode and disable tracking of stats through callbacks. We do this every epoch because the model is set to train mode after the validation step in each epoch which reverts the change we make:
# Add a callback to put the frozen layers in eval mode to prevent BN values
# from changing.

def put_in_eval_mode(trainer, n_layers=22):
  for i, (name, module) in enumerate(trainer.model.named_modules()):
    if name.endswith("bn") and int(name.split('.')[1]) < n_layers:
      module.eval()
      module.track_running_stats = False
      # print(name, " put in eval mode.")

model.add_callback("on_train_epoch_start", put_in_eval_mode)

# Also add it during model setup because of a bug that changes the BN values even before the training starts.
model.add_callback("on_pretrain_routine_start", put_in_eval_mode)
Now start the training, while specifying the number of layers to be frozen:
# Train the model. Freeze the first 22 layers [0-21].
results = model.train(data='/content/datasets/data.yaml', freeze=22, epochs=100, imgsz=640)
Our final validation metrics look good:
                 Class     Images  Instances      Box(P          R      mAP50  mAP50-95): 100%|██████████| 7/7 [00:05<00:00,  1.34it/s]
                   all        200        218      0.859      0.887      0.944       0.76
       d_license_plate        200        107      0.878      0.871      0.939      0.764
      pl_license_plate        200        111      0.841      0.903      0.949      0.757
Now we need to check whether the freezing worked. All the weights and BN statistics should remain unchanged, except in the case of the head.
def compare_dicts(state_dict1, state_dict2):
    # Compare the keys
    keys1 = set(state_dict1.keys())
    keys2 = set(state_dict2.keys())

    if keys1 != keys2:
        print("Models have different parameter names.")
        return False

    # Compare the values (weights)
    for key in keys1:
        if not torch.equal(state_dict1[key], state_dict2[key]):
            print(f"Weights for parameter '{key}' are different.")
            if "bn" in key and "22" not in key:
              state_dict1[key] = state_dict2[key]

# Compare the dicts. Changes should only be in layer 22 and above
compare_dicts(old_dict, model.state_dict())
The output should look like this, which means it worked. Only layer 22 weights and batch statistics are different:
Weights for parameter 'model.model.22.cv3.1.2.weight' are different.
Weights for parameter 'model.model.22.cv2.0.1.conv.weight' are different.
Weights for parameter 'model.model.22.cv2.1.0.bn.running_var' are different.
Weights for parameter 'model.model.22.cv2.0.0.bn.bias' are different.
Weights for parameter 'model.model.22.cv3.0.0.bn.weight' are different
...
...
Now we will save the state dict from this model, but before that, we will increment the layer number of the head. You’ll know why in the next section:
new_state_dict = dict()

#  Increment the head number by 1 in the state_dict
for k, v in model.state_dict().items():
  if k.startswith("model.model.22"):
    new_state_dict[k.replace("model.22", "model.23")] = v

# Save the current state_dict. Only layer 23.
torch.save(new_state_dict, "yolov8n_lp.pth")
That’s it for the training. Now we come to the more technical part.
Modifying YOLOv8 to add an extra head with new classes
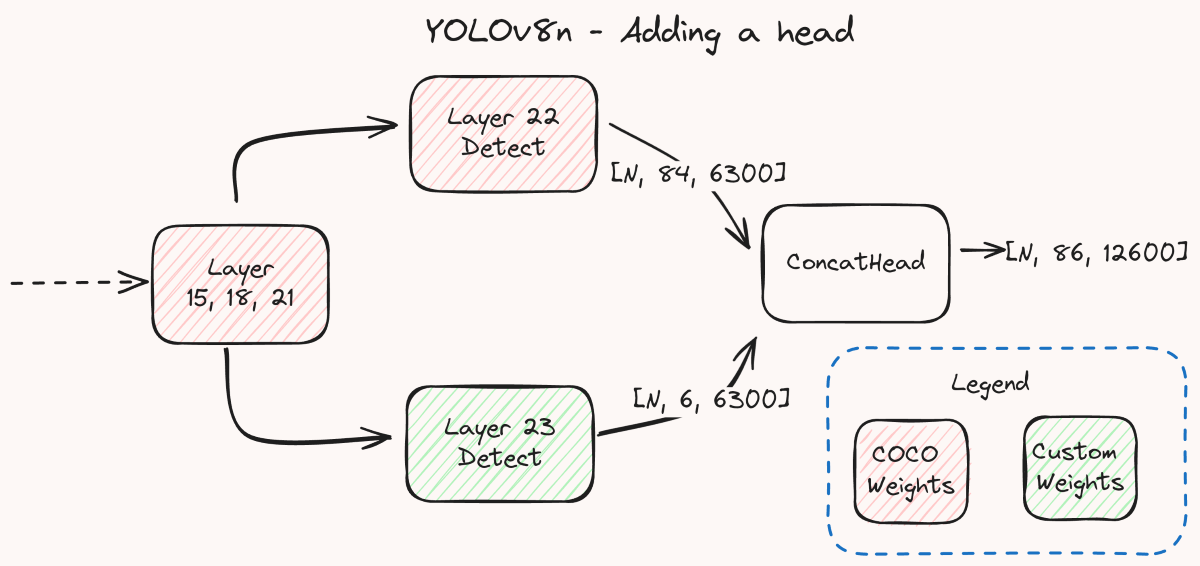
There are quite a few changes that have been made to get the extra head to work, which you can read fully in the patch. The changes are only for the detection task, so it would require different changes if you want to do the same for segmentation or other tasks. I will highlight the most important change which is the addition of a new layer called ConcatHead. The definition looks like this:
class ConcatHead(nn.Module):
    """Concatenaion layer for Detect heads."""

    def __init__(self, nc1=80, nc2=1, ch=()):
        """Initializes the ConcatHead."""
        super().__init__()
        self.nc1 = nc1  # number of classes of head 1
        self.nc2 = nc2  # number of classes of head 2

    def forward(self, x):
        """Concatenates and returns predicted bounding boxes and class probabilities."""

        # x is a list of length 2
        # Each element is either a tuple or just the decoded features
        # depending whether it's being exported.
        # First element of tuple are the decoded preds,
        # second element are feature maps for heatmap visualization

        if isinstance(x[0], tuple):
          preds1 = x[0][0]
          preds2 = x[1][0]
        elif isinstance(x[0], list): # when returned raw outputs
          # The shape is used for stride creation in tasks.py.
          # Feature maps will have to be decoded individually if used as they can't be merged.
          return [torch.cat((x0, x1), dim=1) for x0, x1 in zip(x[0], x[1])]
        else:
          preds1 = x[0]
          preds2 = x[1]

        # Concatenate the new head outputs as extra outputs

        # 1. Concatenate bbox outputs
        # Shape changes from [N, 4, 6300] to [N, 4, 12600]
        preds = torch.cat((preds1[:, :4, :], preds2[:, :4, :]), dim=2)

        # 2. Concatenate class outputs
        # Append preds 1 with empty outputs of size 6300
        shape = list(preds1.shape)
        shape[-1] *= 2

        preds1_extended = torch.zeros(shape, device=preds1.device,
                                      dtype=preds1.dtype)
        preds1_extended[..., : preds1.shape[-1]] = preds1

        # Prepend preds 2 with empty outputs of size 6300
        shape = list(preds2.shape)
        shape[-1] *= 2

        preds2_extended = torch.zeros(shape, device=preds2.device,
                                      dtype=preds2.dtype)
        preds2_extended[..., preds2.shape[-1] :] = preds2

        # Arrange the class probabilities in order preds1, preds2. The
        # class indices of preds2 will therefore start after preds1
        preds = torch.cat((preds, preds1_extended[:, 4:, :]), dim=1)
        preds = torch.cat((preds, preds2_extended[:, 4:, :]), dim=1)

        if isinstance(x[0], tuple):
          return (preds, x[0][1])
        else:
          return preds
The goal of this layer is to take in the output from both the heads, the original COCO head and the new head and then merge it such that they behave like one single head for downstream postprocessing. The comments provide information as to what each block of code is for. We first merge the bounding box proposals from the two heads by concatenating the first 4 rows of outputs that contain these proposals. We concatenate them in the third dimension, essentially doubling the number of outputs that it produces. The first 6300 outputs are the ones from the first head and the second 6300 are from the second head, together producing an output of size 12600.
For the classification outputs, we do a similar thing. Since we have to make the outputs for those 12600 too, we add zeros to extend the classification outputs from both heads to match that size. For the first head, the zeros are appended, i.e., added after the original outputs to correspond with the way we merged the bounding box proposals (first head first). For the second head, the zeros are prepended, again to correspond with the way we merged the bounding box proposals (second head after the first head). Then we just concatenate the preds in order. The first 4 rows from both heads have already been added during the bounding proposal concatenation. To this, we concatenate the remaining rows of the output from the first head. And then the remaining rows of the output from second head are concatenated. Remember, we are skipping the first 4 since they were already taken care of during the bounding box proposal concatenation like I mentioned. The final output is of shape [N, 86, 12600] in our case where 86 comes from the 4 coordinates, 80 COCO classes and 2 license plate classes.
And that’s all we need to do to produce the merged output. We also return the features from the first head as is, which is used for feature visualization. It’s not relevant to the predictions, so not merging them doesn’t make a big difference except for breaking the feature heatmap visualization which we aren’t using.
There are also some changes to the way the heads are initialized because the original code expects the last layer to be the Detect head, but due to our changes, that assumption is no longer valid.
Finally, we create the new architecture like so:
nc: 82

...
...
...
# same as ultralytics/cfg/models/v8/yolov8n.yaml
...
...
...

# YOLOv8.0n head
head:
  ...
  ...
  ...
  - [-1, 1, Conv, [512, 3, 2]]
  - [[-1, 9], 1, Concat, [1]] # cat head P5
  - [-1, 3, C2f, [1024]] # 21 (P5/32-large)

   # Layer 22. First list indicates the layers whose output are used as input.
   # We indicate that this head has 80 outputs.
  - [[15, 18, 21], 1, Detect, [80]] # Detect(P3, P4, P5)

   # Layer 23. We indicate that this head has 2 outputs, because that's how
   # many new classes we added.
  - [[15, 18, 21], 1, Detect, [2]] # Detect(P3, P4, P5) #23 new classes

  # ConcatHead takes in layer 22 and 23 and concatenates the output.
  - [[22, 23], 1, ConcatHead, [80, 2]] # Concat #22 and #23
We change the nc to reflect the total number of classes, in our case 80 COCO + 2 additional = 82. Besides that the changes are only in the last 3 layers. We change layer 22 and indicate that it produces 80 outputs. This will be the original head. Then we add a new layer, layer 23 (yes, that’s why we incremented the layer number before) for the extra head. Then we end it with our custom ConcatHead layer that would concatenate the outputs from layer 22 and layer 23.
Now we create a model using this new architecture and then load the COCO weights to it:
model_2 = YOLO('ultralytics/cfg/models/v8/yolov8n-2xhead.yaml', task="detect").load('yolov8n.pt')The output says:
Transferred 355/440 items from pretrained weightsIt correctly transfers all the COCO weights because the first 23 layers (including the COCO head) are identical to the original model. But since it doesn’t have any weights for the 24th layer (the 24th layer is layer 23; the index starts from 0), nothing is transferred for that layer and it remains randomly initialized. So we will manually load the weights for layer 23, i.e., the additional head from the state dict we saved:
state_dict = torch.load("yolov8n_lp.pth")

# Load state_dict of the custom trained model head. Layer 23.
model_2.load_state_dict(state_dict, strict=False)
It should say that it didn’t find the first 23 layers, but that’s okay. We only want to transfer the weights for layer 23.
That should be it. The above model will now combine the outputs from both heads in its prediction.
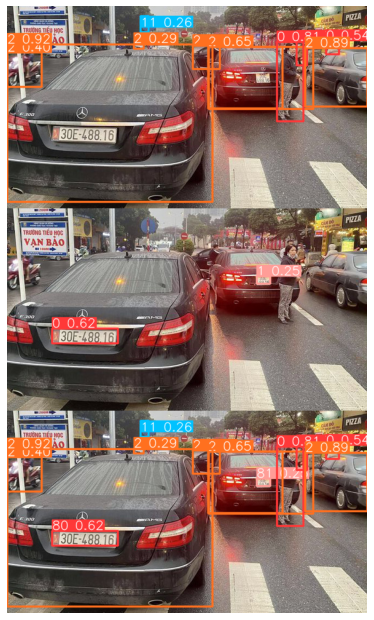
Below are the predictions from the original COCO model, the custom-trained license plate detection model and the merged model respectively. You can see the confidences are exactly the same, as expected, and the class numbering for the second head also correctly starts after the first head. Both the heads run independently and reuse the same outputs from the first 22 layers:
Caveats and conclusion
The approach used here tries to get the best of both worlds when it comes to adding new classes to the COCO pretrained models without long training times and significant performance hits. There is of course a caveat here. Since the heads rely on the frozen features from the previous layers, if those layers do not contain the relevant features, the head will not perform well. This would probably happen if you train the model on a dataset that looks very different from COCO such as an aerial view dataset. And since the backbone is not finetuned, it is also possible the additional classes don’t reach the same performance they would have reached if trained from scratch and with all the layers unfrozen. One thing that could be tried to possibly improve the performance is to unfreeze one or more of the last layers during the training so that they can get finetuned to the task. Of course, this also means you will have to duplicate these layers as a separate branch, just as we duplicated the head, and load the COCO weights correctly in the COCO branch and the custom-trained weights in the additional branch, but it shouldn’t be difficult following the formula outlined in this guide. Moreover, there is no need to concatenate the outputs from these additional layers, as they would just be passed down to individual heads, so you don’t have to worry about a complicated concatenation procedure.
And that’s all. Thanks for reading.